Create Flow Tasks from Emails
Postbox's Quick Post feature enables you to quickly set up and use send-to-service email addresses, and automatically add the appropriate tags to the beginning or end of the subject line. Best of all, you can send content to the service in the background, without having to open up a compose window.
With Flow, you can turn emails into tasks, assign those tasks to a team member, and set due dates using your unique Flow email address.
Find your Flow email address
Flow has two options for an email to task creation. The first is most helpful if you are only looking to create tasks for yourself. Emails sent to the email address [email protected] from your registered email address will be added to My Tasks.
The other option is for teams. Each team member can be assigned a specific Flow email address. Emails sent to someone will be uploaded as their task. First, go to your Billing & Organization Settings in Flow. Toggle on the Require Secure Email Task Creation setting at the bottom of the Organization Settings window. Click Save Settings.
Once this feature is enabled for your group, you can find your individual email address by going to Account Preferences > Email Tasks to Flow. Click on Copy email to save to your clipboard. Once the individual email addresses are assigned the generic [email protected] will not work for your group.
After finding each email address, you’ll need to make sure your tasks are being sent to the correct team (if you have more than one). To do this go to your Account Preferences > Email Tasks to Flow > Edit. Besides each email address, select the team in the drop-down menu. Click Save Settings.
Create your Quick Post
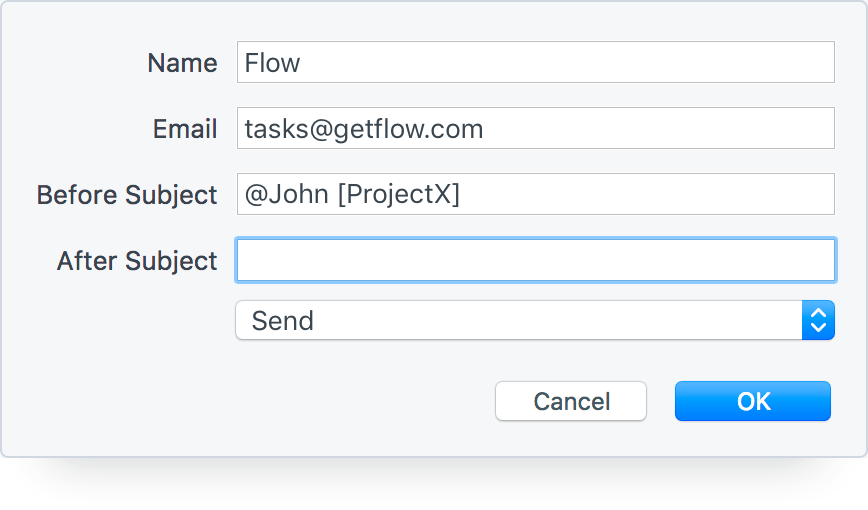
In Postbox, navigate to Preferences or Options > Advanced > Quick Post and then click the + button to create a new Quick Post.
Create a name for the Quick Post, then enter the Flow email address.

You can add special characters in your subject line to specify which people you want to assign the task, which tags you'd like to add, due dates for the task, etc.:
- $TeamName: Use the dollar sign ($) to set a task to a team.
- [Project Name]: By enclosing your project name in brackets, you can add the task to different projects, like [Big Project] or [Bigger Project].
- {Section}: Add the task to a specific section within a project by enclosing the section name in curly brackets. [Bigger Project] {Meetings}.
- @Person: Delegate a task to someone with the @ symbol followed by the first name. If you have more than one person in your organization, use the first name and the last initial surrounded by quotation marks, e.g., @"Luke S". You can also delegate using "delegate:" followed by the name, e.g., delegate: Jim.
- +Subscriber: To subscribe people to notifications use the + symbol followed by the name or their email address, like +Allen.
- !Due Date: Assign a due date to a task using the exclamation point (!). Simply include two exclamation points to set the due date for today, e.g., !!Fix the problems. Use either days of the week or dates using the basic date formatting (MM/DD/YYYY). To change the date format to DD/MM/YYYY, include a tilde (~) after the exclamation point.
- #Tag: Add tags to the task using # or "tag:", e.g., tag:reports.
- Attachments: Attach files to the email to upload them to the task.
Note:, If the name uses more than one word, include quotations around the name, like @"Sam G" or tag:"this, that, everything". The project name does not need quotation marks. Multiple subscribers and tags need to be separated by commas. If using keywords instead of symbols (tag vs. #), do not put a space after the keyword. Someone must be assigned to a task. If no one is delegated, it will be added to the sender's tasks.
Standard format
Email Subject: Name of Task $TeamName [Project Name] {Section} @Delegate +Subscriber !Due Date #Tag
Note: No specific order of the symbols is needed.
Examples
Assign the budget planning to Tom, assign a due date, add to the budget tag, and subscribe Bob and Betty to get notifications:
- Email Subject: 3Q Budget Plan @Tom !Friday #budget +"Bob, Betty"
Assign the holiday celebration to Summer, set it to the admin team, add it to the Planning project, and the section Celebrations:
- Email Subject: Holiday Celebration @Summer $Admin [Planning] {Celebrations}
Nesting Quick Posts
Quick Posts can be nested by including "Parent Menu::" before the Direct Post name. For example, say you have the following Flow teams:
- Team 1
- Team 2
- Team 3
When setting up the Quick Posts for each team, you can then name them:
- Flow::Team 1
- Flow::Team 2
- Flow::Team 3
When you access your Quick Posts, those three options will then appear under the parent menu "Flow". You can select one of these options under the parent menu to send the task to that team.
Specify how the message should be sent
Send As Attachment is usually the best way to go since you're forwarding the original email. Services can then do the right thing with regards to images as attachments, for instance.
Send should be used when the service doesn't know how to process .eml files as attachments, like Trello or Slack. However, it does have some limitations. For example, images embedded into the message body as an IMAP URL won't show in the destination.
Send via Compose Window will bring up the Compose Window, which you can then edit before sending. This option is also the best one to use for images embedded into the message body as an IMAP URL.
Automatic email filtering or forwarding
You can also set up Postbox's email filters to automatically trigger a Quick Post when you receive an email from a specific sender or with a particular subject.
For example, you can configure Postbox to quick post any emails sent from "Your boss" with "weekly report" in the subject line to your tasks.
To set this up, go to Postbox's Tools menu > Message Filters > New, set your filter criteria, then for the action select Quick Post and then your desired Quick Post.
But note that messages are always sent As Attachment when using a filter action because, by their nature, filter actions run in the background. So be sure to select "Send as Attachment" within the editor panel for this Quick Post.

